As an Amazon Associate, we earn from qualifying purchases. Some links on this site are affiliate links at no extra cost to you. Our recommendations are based on thorough research and editorial judgment.

How To Use Scanner Calibration Color Target?
To use a scanner calibration color target, we should first guarantee our scanner is warmed up and the glass is clean. Next, we place the target flat on the scanner and conduct a prescan to check positioning. After adjusting settings, we execute a full scan under controlled lighting. By utilizing calibration software, we can fine-tune colors and generate ICC profiles for more accurate outputs. This process helps improve our scans considerably—there’s more to discover about maintaining ideal settings.
Key Takeaways
- Ensure the scanner is warmed up and clean before placing the calibration target on the glass for optimal results.
- Use calibration software compatible with your scanner model for accurate adjustments and settings.
- Conduct a prescan to verify target positioning and make any necessary adjustments prior to the full scan.
- Scan the calibration target at a resolution of 200ppi under controlled lighting to ensure consistent color accuracy.
- Load the scanned image into profiling software to create and install ICC profiles for improved color management.
Understanding the Purpose of Scanner Calibration Color Targets

You may be interested


When we consider the purpose of scanner calibration color targets, it’s clear that they play a vital role in ensuring color accuracy in our digital scans. These targets help align our scanner output with standard reference values, correcting inherent color deviations and scanner defects, which can lead to inconsistent results. By providing a consistent baseline for measuring color reproduction, they facilitate the creation of ICC profiles that aid in software color adjustments. This process not only streamlines color management workflows but also reduces the need for manual color correction after scanning. Ultimately, using calibration color targets allows us to achieve professional-grade output with better precision and efficiency, maintaining color consistency across diverse projects and devices. Regular calibration frequency recommendations ensure optimal scanner performance and image quality.
Components of a Calibration Target
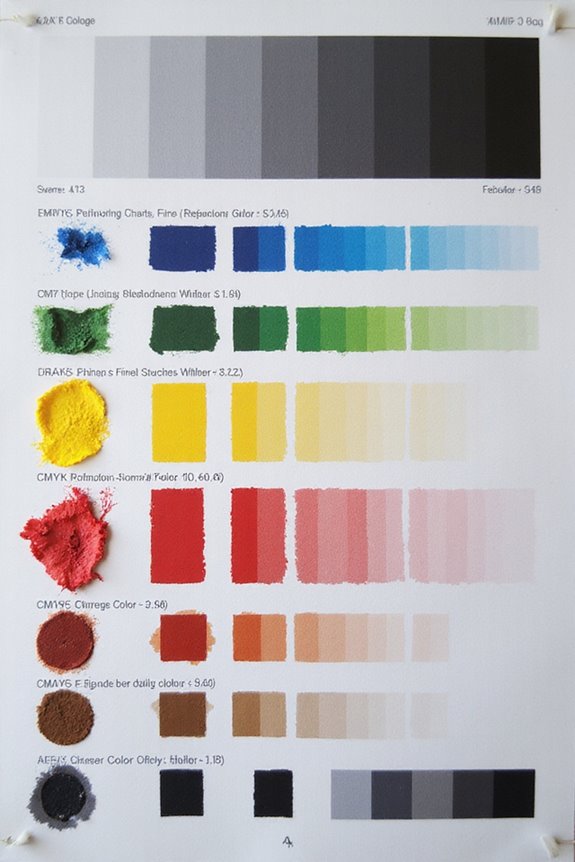
Calibration targets consist of several essential components that work together to guarantee accurate color reproduction during scanning. At the heart of these targets is a precise color patch design, featuring color patches that represent various hues, like CMY and RGB, alongside neutral grays. Each patch has predefined spectral reflectance data, ensuring reliable comparison against scanned values. The materials used are stable and non-yellowing, maintaining integrity over time, which is vital for consistent results. Additionally, standardized layouts conform to industry norms for uniformity. The physical size varies, accommodating common scanner dimensions, while high-quality pigment-based patches minimize color instability. Together, these components enhance our ability to calibrate scanners effectively, achieving ideal color accuracy in our scanned images. Moreover, the use of optical character recognition (OCR) technology can further improve the efficiency of the scanning process by converting scanned images into editable text.
Steps to Perform a Scan With a Calibration Target

Having explored the components that make up a calibration target, it’s time to focus on how to effectively use it for scanning. First, we should verify our scanner is warmed up for 15-30 minutes and the glass is clean. Next, we’ll launch the calibration software and place the target flat on the scanner glass. A prescan will help us check positioning and adjust settings for peak scan accuracy.
Then, we execute a full scan, keeping light conditions controlled. This process allows the software to analyze the color patches against reference values. If needed, we can repeat the scan to verify color consistency. Following these steps guarantees our scanner reproduces colors accurately and meets our quality standards every time. Additionally, ensuring compatibility with various vehicle brands can enhance the accuracy of the scan results in automotive applications.
Utilizing Calibration Software for Color Adjustment

To achieve the best color representation in our scanned images, we should rely on calibration software designed for our specific scanner model. Many options are available, including SilverFast and native software, which help us optimize color accuracy. These tools often require a calibration target to adjust the scanner settings effectively. Each operating system—Windows, macOS, and Linux—has tailored instructions, ensuring we get precise results. Significantly, some software provides automatic IT8 calibration, simplifying the process while enhancing consistency. By using calibration software regularly, we can save time on post-scan adjustments and maintain reliable color representation. This attention to detail benefits both professionals and enthusiasts, ensuring our scanned images reflect the true colors of original works accurately. Additionally, high-quality scanners often integrate seamlessly with such software, maximizing their color calibration capabilities.
Generating and Applying Scanner Profiles
With the proper calibration software in place, generating and applying scanner profiles becomes a seamless process that greatly enhances our scanning results. First, we need to accurately scan a standard calibration color target, guaranteeing settings are at default and resolution is set to 200ppi. Once we have our scanned image, we’ll load it into the profiling software and compare its values with reference data. By selecting the right algorithm, we guarantee scanner accuracy in our profiles. We can then install these ICC profiles in our systems, applying them to enhance our color management during scans. Additionally, ensuring high scanning resolution can significantly improve the quality of the scanned images. It’s essential to maintain profile management by periodically checking results and recording creation dates for consistent, reliable outcomes.
Frequently Asked Questions
How Often Should I Recalibrate My Scanner?
We should recalibrate our scanner based on its performance and usage intensity. For ideal results, a monthly calibration frequency is often recommended, particularly in environments requiring consistent color accuracy and high-quality outputs.
Can I Use Any Color Target for Calibration?
We can’t just use any color target for calibration; specific color target types guarantee calibration accuracy. Without precise colorimetric values, we risk inaccurate profiles and unpredictable color output in our scanned images.
What if My Scanned Colors Still Look Different?
Just like a painter adjusting shades under changing skies, we must explore color correction techniques when our scanned colors differ. Consider lighting conditions and recalibrate; sometimes, the source of the artwork’s essence lies within those details.
Do Calibration Targets Expire or Degrade Over Time?
Calibration targets do degrade over time, impacting their lifespan and color accuracy factors. We need to monitor them regularly, ensuring they remain reliable references for scanner calibration, preserving our output’s consistency and precision.
Are There Different Targets for Different Types of Scanners?
Yes, there’re different target types for various scanners. We need to guarantee scanner compatibility by selecting the correct calibration target for our specific media, whether it’s reflective for documents or transmissive for film.