As an Amazon Associate, we earn from qualifying purchases. Some links on this site are affiliate links at no extra cost to you. Our recommendations are based on thorough research and editorial judgment.
How To Use Scanner Slide Holder Attachment?
To use a scanner slide holder attachment, we first verify it’s compatible with our scanner. We align and secure our slides within the holder, taking care to avoid touching the glass. This stable setup, often featuring magnetic attachments, provides precise scanning with effective light source conditions. We can load multiple slides efficiently, and using a dedicated slide basket streamlines the process. With regular inspections and adjustments, we enhance performance and protect our slides, so let’s explore more effective tips on this topic.
Key Takeaways
- Install the slide holder by aligning it with the scanner’s designated slot and ensuring secure placement with a confirming click.
- Adjust the slide holder for size compatibility using thumb screws or sliding parts before scanning different slide dimensions.
- Use a slide basket system for continuous feeding and take advantage of the spring track mechanism for smooth slide advancement.
- Regularly inspect the slide holder and scanning mechanisms to prevent issues such as warping or slipping during the scanning process.
- Follow best practices by holding slides by their edges, avoiding contact with cover glass, and promptly removing them after use to prevent damage.
Understanding the Slide Holder Attachment
You may be interested


Understanding the slide holder attachment is vital for anyone looking to optimize their scanning experience. These attachments enhance slide stability, guaranteeing mounted slides remain flat and secure during scanning. Utilizing precision locking screws, they prevent any unwanted movement, which is essential for alignment accuracy. Made from lightweight carbon fiber or durable plastics, these holders are robust yet easy to handle. Features like guide rails allow sequential scanning, making batch processes quick and efficient. Magnetic attachment methods simplify mounting to compatible scanners, while thumbscrews make it easy to adjust for various 35mm slide sizes. By maintaining a steady position, we can guarantee the quality and consistency of our scanned images remains high, enhancing our overall results considerably. Additionally, using a scanner with high resolution options can further improve the clarity and detail of your digitized slides.
Required Equipment and Compatibility

Selecting the right equipment for using a slide holder attachment is essential for achieving ideal results in digital slide scanning. First, let’s look at slide compatibility; most holders cater to standard sizes like 35mm or 6x6cm, so confirming these dimensions is vital before purchase. We’ll also want a dedicated slide holder plate that securely fastens our slides, along with a compatible light source for even illumination.
Next, our setup requires a high-dynamic-range digital camera, ensuring we capture every detail vividly. For efficient workflows, slide baskets can streamline handling, allowing us to scan continuously. Additionally, considering image quality expectations will help enhance our scanning efficiency and image quality, making our slide scanning projects both enjoyable and rewarding.
Materials and Construction Features
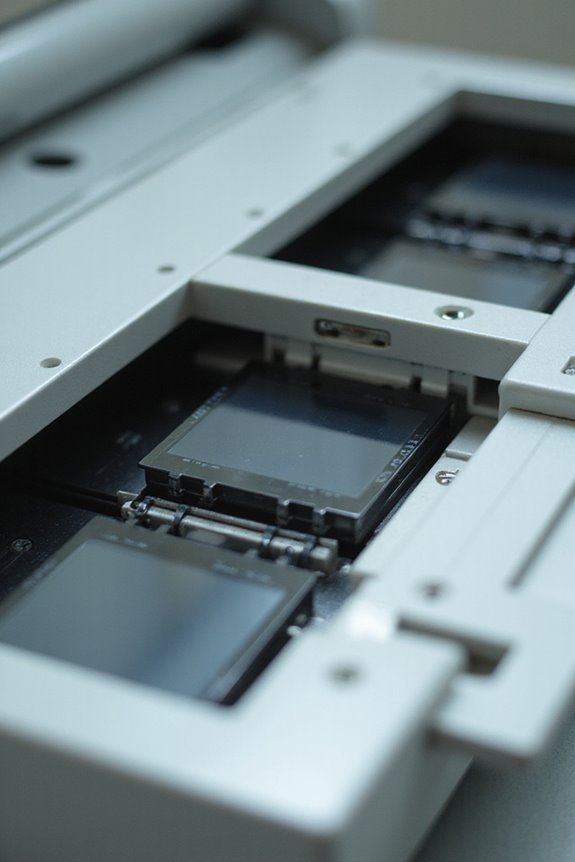
When it comes to scanner slide holder attachments, the materials and construction features play a significant role in their performance and user experience. Most attachments utilize durable carbon fiber, which is both lightweight and strong, ensuring precise slide handling. Many components are 3D-printed from PLA for accuracy, while opaque black materials help prevent light leaks. Machined aluminum parts, like M4 thumb screws, allow quick size adjustments and secure locking. Significantly, our design features include guide rails for smooth slide shifts and precision locking screws that fit slides 1 to 4 mm thick. Plus, magnetic attachments enhance stability and alignment. Each holder’s thoughtful construction minimizes jamming, promising ideal scanning quality and protecting your valuable slides. Additionally, the incorporation of frame-by-frame scanning enhances image clarity, ensuring your slides are digitized with the utmost detail.
Installation and Setup Guide

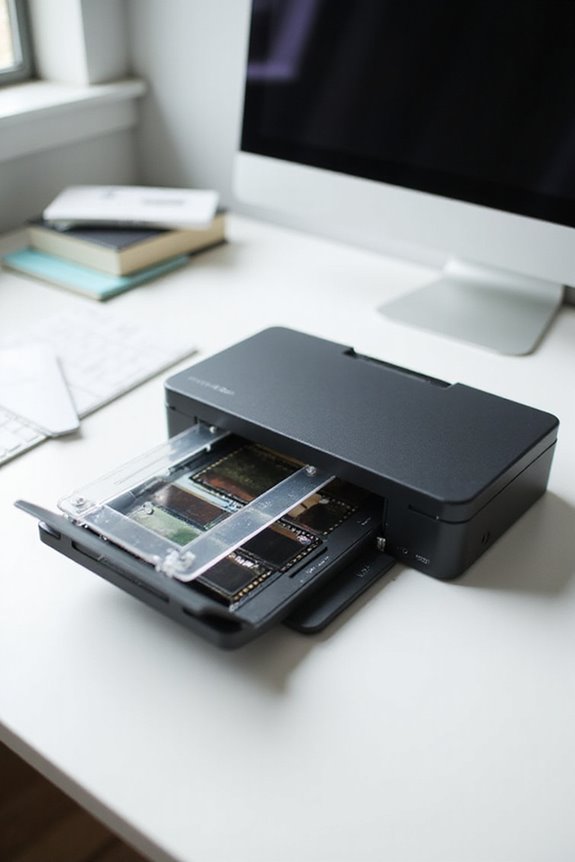
Installing the slide holder attachment can enhance our scanning experience considerably. First, let’s power on the scanner and complete initialization. Following on-screen prompts related to our chosen software, like FlexColor, is essential. We need to open the slide holder compartment firmly, ensuring the slide holder types we have are compatible. Holding the slide holder securely, we align it with the designated slot inside the scanner. It’s crucial to insert the holder gently, ensuring a snug fit to prevent damage. After placing it correctly, we close the magazines or drawers until we hear a click, confirming that everything is secure. Finally, we launch the scanning software to detect our slide holder, adjusting settings to match our slide format. Additionally, utilizing the Digital ICE technology can help restore and enhance scanned images for better quality.
Loading Your Slides Properly
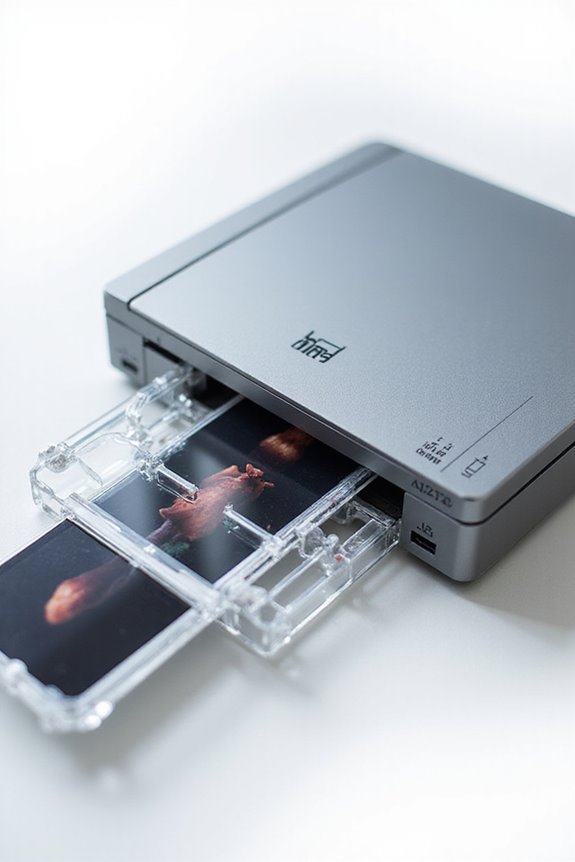
Loading your slides properly is essential to achieving excellent scan quality and preventing misfeeds. First, we should hold the slide with the trademark side facing away; this guarantees correct image orientation. When inserting, slide alignment is vital; we need to check that the image is not reversed. Using the recessed area in the slide holder allows for a comfortable fit, locking the slide in place to prevent movement. While inserting, gentle pressure application may be required to tuck slides under the springs, which will keep them pressed firmly against the scanning surface. It’s important we hear a distinct click when a slide is in place, confirming proper positioning and preventing misalignment as we proceed. Additionally, using a scanner with high scanning resolutions will help ensure that the details of your slides are accurately captured.
Scanning Process and Efficiency Tips
Now that we’ve loaded our slides correctly, the scanning process can begin. To optimize our workflow, we’ll use a slide holder and basket system for continuous slide feeding. This setup speeds up slide scanning considerably. The spring track mechanism in the holder guarantees slides are secured and advances smoothly without manual effort. We should also deploy magnets on slide baskets for easy attachment, making retrieval simple. Batch scanning sessions let us capture multiple slides instantly, bypassing slower processes. By utilizing digital cameras, we can achieve superior dynamic range and detail in our scans. Regularly reviewing our scans via software helps catch any imperfections without disrupting our efficient workflow. Adapting these practices will enhance our scanning experience and results. Additionally, using a scanner with high-resolution scans can significantly improve the quality of the final images.
Utilizing Scanning Hoods for Better Quality
Three key advantages make utilizing scanning hoods essential for achieving better quality in document scanning. First, they reduce ambient light interference, which minimizes glare and reflections, ensuring higher image clarity. This stability enhances color accuracy and detail capture, allowing us to reproduce even the most intricate features, like faded text. Second, scanning hoods offer significant document protection, acting as a barrier against dust and accidental light exposure that could harm fragile or sensitive materials. Finally, by maintaining consistent lighting conditions, they improve image uniformity across our scans, vital for larger documents. Together, these scanning benefits elevate our overall scanning quality and extend the lifespan of our valuable physical documents, making scanning hoods an invaluable addition to our process.
Maintenance and Cleaning Practices
To guarantee ideal performance and longevity of our scanner slide holder attachment, consistent maintenance and cleaning practices are essential. We should start by using soft, lint-free cloths and cleaning techniques to remove dust and fingerprints regularly. Rinsing the slide holder with distilled water helps avoid residue buildup, while air drying at room temperature prevents moisture damage. It’s important to clean slide holders immediately after use to secure consistent scan quality. Furthermore, maintaining a maintenance schedule that includes regular inspections for alignment is critical. Storing slide holders in dry, temperature-controlled environments protects them from degradation and misalignment. By adhering to these practices, we can enhance the scanning experience and prolong the life of our equipment.
Common Adjustments and Customizations
Whether we’re refining our scanning process or addressing specific needs, common adjustments and customizations for our scanner slide holder attachment can greatly enhance our experience. Implementing size adjustments, like using thumb screws or sliding parts, allows us to accommodate various slide dimensions easily. We can make precision adjustments, enabling a snug hold, which minimizes the risk of slide damage. Additionally, managing spring tension is essential. The right tension keeps slides securely against the track, improving alignment and clarity. We should inspect these mechanisms regularly, as overly tight springs can warp our slides while loose ones may lead to slips. These adjustments not only optimize our scans but also streamline our workflow, making our scanning process more efficient.
Best Practices for Handling Slides
When handling slides, it is crucial to prioritize care and precision, as good practices can greatly enhance specimen integrity and observation quality. We should always hold slides exclusively by the edges to prevent contamination or damage to the cover glass. Touching the cover glass must be avoided, as it can compromise the slide’s integrity. Starting with the lowest magnification during observation helps prevent lens contact, protecting our slides. After use, we need to promptly remove slides to prevent exposure-related fading. For slide maintenance, cleaning should only occur with gentle solutions, avoiding soaking. Storing slides horizontally in dedicated containers safeguards them from dust and physical damage while keeping them in cool, dark environments helps preserve specimen quality over time.
Frequently Asked Questions
Can I Use the Slide Holder With Other Scanner Brands?
Yes, we can use the slide holder with various scanner brands. Slide compatibility generally hinges on design standards, so if our scanner accepts 35mm slides, we should be able to interchange holders without issue.
What Is the Maximum Slide Thickness Supported?
What if we could scan all our slides effortlessly? Most holders support slide dimensions from 1.5 to 4 mm thick, but we should always check for compatibility concerns to avoid issues with fragile mounts.
Is a Specific Scanning Software Required?
When it comes to scanner compatibility, specific software requirements depend on the type of slide holder we’re using. Digital camera setups generally don’t need specialized software, while dedicated scanners often require their proprietary programs to function properly.
How Do I Troubleshoot Slide Misalignment Issues?
When tackling slide misalignment, we should apply troubleshooting techniques like checking the slide holder’s fit, tightening clamps, and ensuring clean optics. Regular calibration and adjusting exposure can also enhance slide alignment and improve our scanning results.
Can I Manually Adjust the Slide Holder Position During Scanning?
Maneuvering our scanner, we shouldn’t make manual adjustments during scanning. Such shifts hinder scanning precision, causing potential misalignment. Let’s secure our slides beforehand for seamless, successful scans every single time, ensuring ideal image outcomes.