As an Amazon Associate, we earn from qualifying purchases. Some links on this site are affiliate links at no extra cost to you. Our recommendations are based on thorough research and editorial judgment.

How To Use Scanner LED Lighting System?
To use the Scanner LED Lighting System effectively, we can start by understanding its features, like 60 W to 90 W brightness and 15° to 20° beam angles for precision. When setting it up, make sure it’s secured near a power source. We can choose between static and dynamic modes for peak performance. Mastering DMX functions allows real-time adjustments, and sound active settings sync with music effortlessly. If we want to enhance our displays, there’s even more to explore.
Key Takeaways
- Choose a suitable mounting technique and securely fasten the scanner LED bar near a power source for easy wiring.
- Select between static and dynamic scanning modes to adjust brightness and energy consumption according to your needs.
- Utilize DMX controllers with unique addresses for each fixture to manage lighting effects and ensure smooth communication.
- Activate sound sync mode for automatic beat-driven lighting or use manual settings for specific color and effects selection.
- Regularly check wiring integrity and adjust brightness levels to maintain optimal performance and reliability throughout the LED’s lifespan.
Understanding the Features of Scanner LED Lighting System
You may be interested


When exploring the Scanner LED Lighting System, we find a remarkable blend of technology that guarantees our lighting setups. These units feature LED brightness levels ranging from 60 W to 90 W, delivering impressive illumination. With beam angles of 15° to 20°, we achieve precise targeting. The rotating gobos types and multiple color wheels provide vibrant visual options, allowing us to tailor our effects. Fast pan tilt capabilities, along with motion macros, enable dynamic movement that keeps audiences engaged. Featuring convenient power linking, we can connect several units effortlessly. Plus, the LED lifespan of 30,000 to 50,000 hours assures reliability. With strobe effects and DMX channels, flexible integration into shows becomes seamless, enhancing our creative possibilities in lighting designs. Additionally, adjustable brightness settings ensure that we can customize the light output for various scanning needs.
Setting Up Your Scanner LED Lighting

Setting up the Scanner LED Lighting System is straightforward and guarantees we get the most out of its impressive features. First, we should choose a mounting technique that suits our vehicle, placing the LED scanner bar near a power source for easier wiring. Using zip ties or mounting brackets secures the bar to a stable surface, avoiding any movement.
Let’s remember some wiring tips: connect only the essential power wires to avoid short circuits, using high-quality cables for a stable flow. It’s vital to keep the control module dry and protected, ideally close to the power source. Regularly checking our wiring integrity will prevent issues down the line, ensuring reliable performance from our LED lighting setup. Additionally, consider the scanning speed of your scanner when using LED lighting, as it can impact the overall efficiency of your scanning process.
Selecting the Right Operational Mode

How can we best select the right operational mode for our Scanner LED Lighting System? We have two main options: static and dynamic scanning. Static scanning activates all LEDs at once, offering maximum brightness without flicker, ideal for close-up displays. However, it requires more driver output and can be costly. Dynamic scanning, on the other hand, lights up segments of LEDs sequentially, which conserves energy but may introduce brightness trade-offs. We can choose scan fractions like 1/4, 1/8, or 1/16 based on our brightness needs and power requirements. It’s important to balance these factors to optimize our system’s performance. Ultimately, our choice impacts image quality and the overall efficiency of the display. Additionally, understanding the importance of maintenance can further enhance the longevity and performance of our lighting system.
Mastering DMX Controller Functions

Mastering DMX controller functions is essential for achieving precise and dynamic lighting control in any production. It is understood that DMX protocols utilize a 512-channel universe, allowing us to manage fixture addressing seamlessly. Each fixture must have a unique address to prevent channel overlap, ensuring our lights won’t misbehave. Using specialized DMX cables guarantees uninterrupted communication, keeping our shows synchronized and professional. Real-time adjustments, such as dimming and color mixing, enhance our productions, while software-based controllers offer advanced programming features like cue stacking. For larger setups, cascading multiple DMX universes provides scalable options for any venue. By understanding these functions, we gain flexibility and control, ultimately elevating our lighting artistry to the next level in every performance. Furthermore, regular diagnostics are recommended for maintaining the health of all equipment used in productions.
Exploring Sound Active and Manual Settings
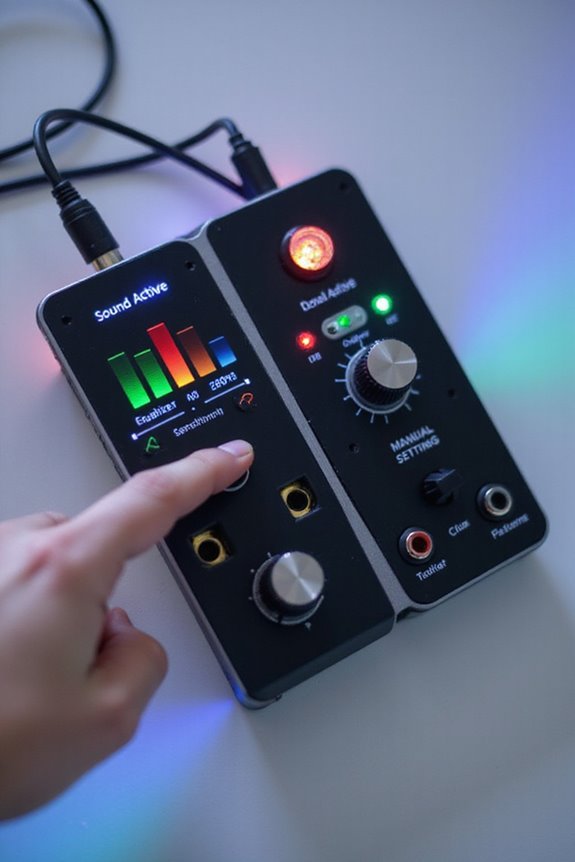
When we explore the sound active and manual settings of the Scanner LED lighting system, we’re diving into versatile ways to create stunning visual displays. The sound active mode enables sound synchronization, allowing our lights to respond to music beats automatically. This is perfect for live events, as it requires minimal setup. However, the pan and tilt ranges reduce considerably compared to DMX control. Manual adjustments are also accessible via a user-friendly 4-button menu. We can select built-in programs and static colors without needing external controllers. Plus, we can manually focus lenses for precise effects. Understanding these options helps us maximize the Scanner LED’s potential, enhancing our lighting experiences whether we’re in sound active or manual mode. Additionally, incorporating wireless connectivity can further streamline the setup process and enhance efficiency during performances.
Creating Dynamic Lighting Effects
Creating dynamic lighting effects with Scanner LED systems can truly transform any event, as these fixtures employ rapid moving mirrors to direct beams of light with remarkable precision. By utilizing high-speed pan and tilt abilities, we can create energetic lighting patterns that draw in attention and enhance the atmosphere. Color wheels and gobo patterns allow us to produce a variety of dynamic patterns, while rotating prisms add an element of visual intrigue. Programming via DMX guarantees our lights synchronize perfectly with music, creating immersive visuals that amplify the overall experience. By experimenting with overlapping colors and movements, we can enhance depth and simulate motion, weaving a mesmerizing visual narrative that keeps our audience engaged throughout the performance. Additionally, utilizing high precision scanning techniques can further enhance the quality of the visual effects we create.
Maintenance and Safety Considerations
To guarantee the best performance of our Scanner LED lighting system, regular maintenance and safety considerations are essential. We should conduct routine inspections to verify bulb operation, ensuring all equipment connections, including power and DMX512 controllers, are secure. Checking the functional accuracy of scanner movement and the consistency of DMX512 signal transmission enhances reliability. It’s important to implement electrical safety measures, inspecting wiring and connectors for wear or overheating. Additionally, cleaning lenses regularly prevents brightness loss and inspecting fixtures eliminates environmental damage. By adhering to these practices, we prolong the lifespan of our system and reduce hazards. Remember, thorough inspections and preventive measures are key to enjoying peak performance and safety with our lighting equipment.
Frequently Asked Questions
Can I Daisy Chain Multiple Scanners Together?
Absolutely, we can daisy chain multiple scanners together! It simplifies our wiring, reduces clutter, and enhances lighting uniformity. Just make certain our scanners are compatible and we respect the manufacturer’s guidelines for safety.
What Is the Weight Limit for Hanging the Scanner?
When considering the weight limit for hanging scanners, we must follow the scanner specifications and guarantee proper hanging techniques. We need to support a minimum point load that’s 10 times the device’s weight for safety.
Are Replacement Parts Readily Available?
When it comes to keeping our scanners humming like a well-tuned orchestra, replacement part options are abundant! We won’t face availability issues, ensuring our devices can shine bright with ease and efficiency.
How Do I Reset the Scanner to Factory Settings?
To reset the scanner to factory settings, we can follow the reset procedure: unplug the scanner, remove the battery, reconnect everything, then power it up and look for initialization signals indicating successful reset.
Can I Use This Scanner Outdoors?
Can we really use this scanner outdoors? Absolutely! With proper weather resistance and durability, it’s designed for outdoor usage, ensuring we can achieve great results even in challenging environments. Let’s make the most of it!